2-2. 웹 요청 처리하기
비동기작업 처리해보기
redux-thunk 를 사용하여 비동기 작업을 한번 처리해보겠습니다. 우리는 axios 라는 라이브러리를 이용햐여 웹 요청을 하겠습니다. axios 는 Promise 기반 HTTP Client 입니다.
Promise 가 뭔가요?
Promise는 ES6 에서 비동기 처리를 다루기위해 사용되는 객체입니다.
예를들어서, 숫자를 1초뒤에 프린트하는 코드를 작성해보겠습니다.
이 코드를 크롬 개발자 도구에서 실행해보세요. (크롬 개발자 콘솔에서 새 줄을 입력 할땐 SHIFT 키를 누르고 엔터를 누르면 됩니다)
function printLater(number) {
    setTimeout(
        function() {
            console.log(number);
        },
        1000
    );
}

printLater(1);
이렇게 doItLater 함수 안에 1 을 프린트하는 함수를 전달해서 호출을 하면, 1초뒤에 프린트가 됩니다.
이번엔 1 초에 걸쳐서 숫자를 더해가면서 1, 2, 3, 4를 프린트하는 코드를 작성해보겠습니다.
function printLater(number, fn) {
    setTimeout(
        function() { console.log(number); fn(); },
        1000
    );
}

printLater(1, function() {
    printLater(2, function() {
        printLater(3, function() {
            printLater(4);
        })
    })
})
비동기적으로 해야 할 작업이 많아진다면, 코드의 구조는 자연스레 깊어질 것이고 그러면 코드를 읽기 힘들어지겠죠? 이를 콜백 지옥이라고도 부릅니다.
기존의 자바스크립트의 이러한 문제에서 구제해주는것이 바로 Promise 입니다. 한번 위 코드를 Promise 로 해결해보겠습니다. 추가적으로, 코드를 더 읽기 쉽게 작성하기위해서 화살표 함수도 사용해볼게요.
function printLater(number) {
    return new Promise( // 새 Promise 를 만들어서 리턴함
        resolve => {
            setTimeout( // 1초뒤 실행하도록 설정
                () => {
                    console.log(number);
                    resolve(); // promise 가 끝났음을 알림
                },
                1000
            )
        }
    )
}


printLater(1)
.then(() => printLater(2))
.then(() => printLater(3))
.then(() => printLater(4))
.then(() => printLater(5))
.then(() => printLater(6))
몇번 하던간에 코드의 깊이는 일정합니다. 따라서 콜백지옥에 빠질일이 없겠죠?
Promise 에서는 값을 리턴 하거나, 에러를 발생 시킬 수도 있습니다.
코드를 다음과 같이 입력해보세요.
function printLater(number) {
    return new Promise( // 새 Promise 를 만들어서 리턴함
        (resolve, reject) => { // resolve 와 reject 를 파라미터로 받습니다
            setTimeout( // 1초뒤 실행하도록 설정
                () => {
                    if(number > 5) { return reject('number is greater than 5'); } // reject 는 에러를 발생시킵니다
                    resolve(number+1); // 현재 숫자에 1을 더한 값을 반환합니다
                    console.log(number);
                },
                1000
            )
        }
    )
}

printLater(1)
.then(num => printLater(num))
.then(num => printLater(num))
.then(num => printLater(num))
.then(num => printLater(num))
.then(num => printLater(num))
.then(num => printLater(num))
.then(num => printLater(num))
.catch(e => console.log(e));
결과:
1
2
3
4
5
number is greater than 5
Promise 를 이제 이해했다면, 본격적으로 axios 를 사용하여 웹 요청을 해보도록 하겠습니다.
axios 설치
$ yarn add axios
yarn 을 통하여 axios 를 설치하세요.
axios 사용해보기
먼저 리덕스와 axios 를 함께 사용해보기전에, axios 만 따로 리액트 컴포넌트 사용해보도록 하겠습니다.
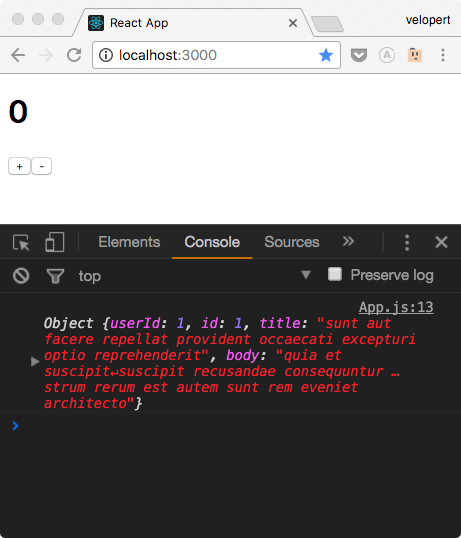
App 컴포넌트에서 axios 를 불러오고 componentDidMount 메소드를 다음과 같이 입력해보세요.
src/App.js
import axios from 'axios';
    componentDidMount() {
        axios.get('https://jsonplaceholder.typicode.com/posts/1')
             .then(response => console.log(response.data));
    }
자, 이제 페이지에 들어가서 개발자 도구의 콘솔을 확인해보세요. 뭔가가 프린트 되었나요?
Thunk 를 통하여 웹 요청 해보기
자 이제 지난 섹션에서 배운 redux-thunk 를 사용하여 웹 요청을 해보겠습니다. modules 디렉토리에 post 모듈을 생성하세요.
src/modules/post.js
import { handleActions } from 'redux-actions';

import axios from 'axios';

function getPostAPI(postId) {
    return axios.get(`https://jsonplaceholder.typicode.com/posts/${postId}`)
}

const GET_POST_PENDING = 'GET_POST_PENDING';
const GET_POST_SUCCESS = 'GET_POST_SUCCESS';
const GET_POST_FAILURE = 'GET_POST_FAILURE';

export const getPost = (postId) => dispatch => {
    // 먼저, 요청이 시작했다는것을 알립니다
    dispatch({type: GET_POST_PENDING});

    // 요청을 시작합니다
    // 여기서 만든 promise 를 return 해줘야, 나중에 컴포넌트에서 호출 할 때 getPost().then(...) 을 할 수 있습니다
    return getPostAPI(postId).then(
        (response) => {
            // 요청이 성공했을경우, 서버 응답내용을 payload 로 설정하여 GET_POST_SUCCESS 액션을 디스패치합니다.
            dispatch({
                type: GET_POST_SUCCESS,
                payload: response
            })
        }
    ).catch(error => {
        // 에러가 발생했을 경우, 에로 내용을 payload 로 설정하여 GET_POST_FAILURE 액션을 디스패치합니다.
        dispatch({
            type: GET_POST_FAILURE,
            payload: error
        });
        // error 를 throw 하여, 이 함수가 실행 된 다음에 다시한번 catch 를 할 수 있게 합니다.
        throw(error);
    })

}

const initialState = {
    pending: false,
    error: false,
    data: {
        title: '',
        body: ''
    }
}

export default handleActions({
    [GET_POST_PENDING]: (state, action) => {
        return {
            ...state,
            pending: true,
            error: false
        };
    },
    [GET_POST_SUCCESS]: (state, action) => {
        const { title, body } = action.payload.data;

        return {
            ...state,
            pending: false,
            data: {
                title, body
            }
        };
    },
    [GET_POST_FAILURE]: (state, action) => {
        return {
            ...state,
            pending: false,
            error: true
        }
    }
}, initialState);
새 모듈을 만들었으니, 리듀서에도 추가해주어야겠죠?
src/modules/index.js
import { combineReducers } from 'redux';
import counter from './counter';
import post from './post';

export default combineReducers({
    counter,
    post
});
이제 곧 컴포넌트로 넘어갈건데요, 그 전에 카운터의 기본 값을 1 로 설정해주세요. 우리가, 이 숫자를 postId 로 사용하여 포스트를 불러올것이기 때문이에요. (postId 가 0인 포스트는 존재하지 않습니다.)
src/modules/counter.js
(...)
export default handleActions({
    [INCREMENT]: (state, action) => state + 1,
    [DECREMENT]: (state, action) => state - 1
}, 1);
컴포넌트에서 액션을 통해 웹 요청 시도하기
App 컴포넌트에서 기존의 axios 를 사용하여 웹요청을 하는 코드를 제거하고, incrementAsync 와 decrementAsync 도 Async 를 지워 이전 상태로 돌려주세요.
import React, { Component } from 'react';
import { bindActionCreators } from 'redux';
import { connect } from 'react-redux';
import * as counterActions from './modules/counter';
import * as postActions from './modules/post';
class App extends Component {
componentDidMount() {
// 컴포넌트가 처음 마운트 될 때 현재 number 를 postId 로 사용하여 포스트 내용을 불러옵니다.
const { number, PostActions } = this.props;
PostActions.getPost(number);
}
componentWillReceiveProps(nextProps) {
const { PostActions } = this.props;
// 현재 number 와 새로 받을 number 가 다를 경우에 요청을 시도합니다.
if(this.props.number !== nextProps.number) {
PostActions.getPost(nextProps.number)
}
}
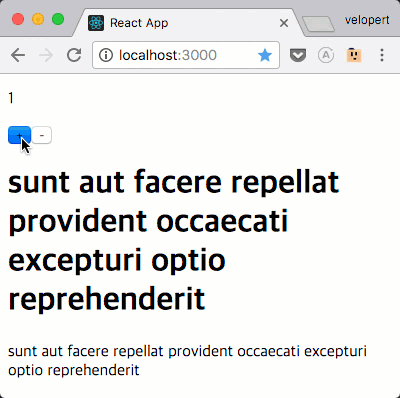
render() {
const { CounterActions, number, post, error, loading } = this.props;
return (
<div>
<p>{number}</p>
<button onClick={CounterActions.increment}>+</button>
<button onClick={CounterActions.decrement}>-</button>
{ loading && <h2>로딩중...</h2>}
{ error
? <h1>에러발생!</h1>
: (
<div>
<h1>{post.title}</h1>
<p>{post.title}</p>
</div>
)}
</div>
);
}
}
export default connect(
(state) => ({
number: state.counter,
post: state.post.data,
loading: state.post.pending,
error: state.post.error
}),
(dispatch) => ({
CounterActions: bindActionCreators(counterActions, dispatch),
PostActions: bindActionCreators(postActions, dispatch)
})
)(App);
자, 이제 요청이 제대로 되는지 확인해보세요.
요청 완료 후 / 에러 발생했을때 추가 작업 하기
만약에 여러분이 요청을 완료 후 컴포넌트에서 해야 할 작업이 있거나, 에러가 발생했을때 어떠한 작업을 해야된다면, async 와 await 을 사용하세요.
이 키워드들은 우리가 액션생성자 함수에서 반환한 Promise 를 기다려준답니다.
async await 을 사용하기위해 새 함수를 다음과 같이 만들고 호출하세요.
src/App.js
import React, { Component } from 'react';
import { bindActionCreators } from 'redux';
import { connect } from 'react-redux';

import * as counterActions from './modules/counter';
import * as postActions from './modules/post';


class App extends Component {

    componentDidMount() {
        const { number } = this.props;
        this.getPost(number);

    }

    componentWillReceiveProps(nextProps) {
        if(this.props.number !== nextProps.number) {
            this.getPost(nextProps.number);
        }
    }

    getPost = async (postId) => {
        const { PostActions } = this.props;

        try {
            await PostActions.getPost(postId);
            console.log('요청이 완료 된 다음에 실행됨')
        } catch(e) {
            console.log('에러가 발생!');
        }
    }

    render() {
        const { CounterActions, number, post, error, loading } = this.props;

        return (
            <div>
                <p>{number}</p>
                <button onClick={CounterActions.increment}>+</button>
                <button onClick={CounterActions.decrement}>-</button>
                { loading && <h2>로딩중...</h2>}
                { error
                    ? <h1>에러발생!</h1>
                    : (
                        <div>
                            <h1>{post.title}</h1>
                            <p>{post.title}</p>
                        </div>
                    )}
            </div>
        );
    }
}

export default connect(
    (state) => ({
        number: state.counter,
        post: state.post.data,
        loading: state.post.pending,
        error: state.post.error
    }),
    (dispatch) => ({
        CounterActions: bindActionCreators(counterActions, dispatch),
        PostActions: bindActionCreators(postActions, dispatch)
    })
)(App);
async 함수를 만들때는 다음과 같이 합니다:
async function foo() {
    const result = await Promise.resolve('hello') ; // Promise.resolve 는 파라미터로 전달된 값을 바로 반환하는 Promise 를 만듭니다.
    console.log(result); // hello
}
// 혹은
const foo = async () => {
    const result = await Promise.resolve('hello') ; // Promise.resolve 는 파라미터로 전달된 값을 바로 반환하는 Promise 를 만듭니다.
    console.log(result); // hello
}
현재 async await 이 작동하는 이유는 create-react-app 으로 만든 프로젝트에는 babel 의 Async to generator transform 플러그인이 적용되어있기 때문입니다. 만약에 이 플러그인이 설치되어있지 않다면 작동하지 않습니다. 그런 경우에는 이렇게 하면 됩니다:
getPost = (postId) => {
    const { PostActions } = this.props;

    PostActions.getPost(postId).then(
        () => {
            console.log('요청이 완료 된 다음에 실행 됨');
        }
    ).catch((e) => {
        console.log('에러가 발생!');
    })
}
여러분들은 Redux 의 정석대로, 비동기 웹 요청을 하는 방법을 배워보았습니다. 어떤가요? 조금은 복잡해 보이지 않나요? 모든 흐름을 다 이해한다 하더라도, 각 요청마다 액션타입을 3개씩 선언하고, 요청전, 요청완료, 요청실패의 상황에 각각 다른 액션을 디스패치해야된다는건 조금은 귀찮은 작업입니다.
하지만 걱정하지마세요. 이 작업을 간소화 해 줄 미들웨어가 존재합니다!
바로 redux-promise-middleware 인데요, 이 미들웨어는 Promise 를 액션의 payload 로 설정해주면, 자동으로 3가지의 액션을 디스패치해줍니다.
다음 섹션에선 이 미들웨어의 사용법을 배워보도록 하겠습니다.